

Manage Backup Policies
Who can use this feature
Anyone with these permissions: Manage backup policies
This article explains how to create and manage backup policies for your project.
From the Backup Policies page, you’ll create the backup policy suited to the resources you want to back up:
Create a backup policy for cloud workloads
To get started, in the Backup Policies page, click Create Backup Policy. The Create Backup Policy page is opened.
Before you start
Before you create a backup policy, make sure you set up the vaults you want the policy to store snapshots in, if applicable.
Name the policy
Provide a Name for the backup policy.
A good policy name describes the kind of data you want to back up.
For example, if backing up production resources that contain PII, you could give the name Prod with PII.
Choose the backup policy type
For Backup source, choose Cloud resources.
Choose the Type of backup policy you want to create: Standard, High frequency, or Point-in-time recovery. For more information on backup policy types, see Backup policy types.
Depending on the type you choose, you’re presented with additional options:
-
For standard backup policies, choose where to store snapshots:
-
For point-in-time recovery backup policies, choose the resource type you want to back up with the policy.
These settings can’t be changed after you continue.
You can confirm the resources the backup policy is available for by clicking Available for x resource types and reviewing the list.
Click Continue.
Choose the dynamic resource selection
In Dynamic resource selection, select your backup policy’s default behavior for including resources:
-
Include all: All resources are included in the backup policy by default. If the policy type doesn’t support all resources, only the supported resources are included.
-
Use conditions: Only the resources that match the conditions you set are included in the backup policy by default. If new resources that meet the conditions are discovered, they’re also included in the policy.
You can set a simple AND or OR list of conditions, or you can group conditions for fine-tuned targeting of resources. See Work with conditions and Work with groups below for how to work with these options.
For an explanation of conditions, see Conditions in About Backup Policies.
-
Exclude all: No resources are included in the backup policy by default. Using this option means that, unless you include resources with manual overrides, no resources are backed up by the policy.
With Include all or Use conditions, the list of resources assigned to the policy can change over time. As Eon discovers new resources that match the policy’s selection criteria, those resources are automatically included in the policy and backed up on the next scheduled run.
Work with conditions
-
To add a condition: Click (Add condition), then select the property, operator, and value for the condition.
-
To add a condition within a group: Click the large (Add condition) button in the group, or select (Add condition) > Add condition > Above or Below. Then select the property, operator, and value for the condition.
-
To delete a condition: Click the condition’s (Actions) menu, then click Delete condition.
For each condition, set the property, operator, and value.
Work with groups
-
To nest an existing condition or group in a group: In an existing condition or group, click (Actions) > Create group. Select the group’s logical AND or OR operator.
-
To delete a group and all the conditions it contains: Click the group’s (Actions) menu, then click Delete group.
Set manual overrides
You can manually include or exclude resources by resource ID, overriding the dynamic selection.
In Included resources or Excluded resources, choose or enter the resource ID you want to override in the respective list, and click to add it to the list. You can provide IDs for resources that aren’t in your inventory yet, but that you anticipate will be discovered at some point in the future.
Click Next to continue.
Review the list of assigned resources
In the Resources list step, you can review the list of resources that meet the conditions you set in the policy and make sure there’s nothing unexpected.
If you need to make changes, click Back to edit your conditions and manually assigned or excluded resources.
When you’re ready to continue, click Next.
Set backup schedules
Choose whether you want a Basic or Advanced schedule. For more information and a comparison between the two, see Backup schedules in About Backup Policies.
Basic schedule
Advanced schedule
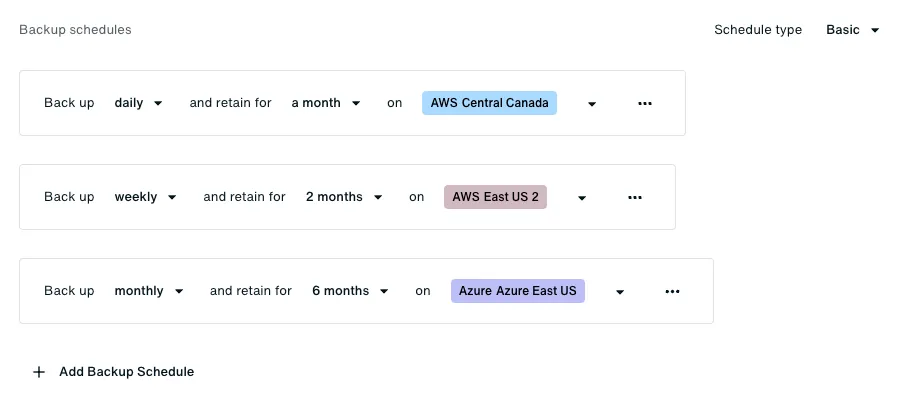
Each basic backup schedule defines a frequency, retention, and vault for snapshots. You can add as many backup schedules as you need.
-
To add a schedule: Click Add Backup Schedule and configure the schedule.
-
To duplicate a schedule: Click the schedule’s (Actions) menu, then click Duplicate.
-
To delete a schedule: Click the schedule’s (Actions) menu, then click Delete.
Additional configuration for source account storage
If you selected AWS source account or Azure source subscription in the “Choose the backup policy type” step, additional configuration options appear in this step:
Vault protection (AWS source account)
When storing snapshots in an AWS source account, you can configure vault protection to enhance the security of your AWS Backup Vaults.
From the Vault protection list, select the protection mode:
-
None: No special protection is applied to the backup vault.
-
VaultLockGovernance: Applies a vault lock in governance mode. Authorized users can make changes to the lock configuration.
-
VaultLockCompliance: Applies a vault lock in compliance mode. After a 3-day grace period, the lock becomes immutable, preventing any changes or deletions of backups until their retention period expires.
-
AirGapped: Creates a logically air-gapped vault for enhanced protection. Provides isolation from customer-managed vaults with retention between 1 and 100 years.
Changing the vault protection mode after creating the policy creates a new AWS vault for future backups. Existing snapshots remain in the old vault.
Backup storage redundancy (Azure source subscription)
When storing snapshots in an Azure source subscription, you must configure backup storage redundancy for the Azure Recovery Services Vault.
From the Backup storage redundancy list, select the redundancy option:
-
LRS (Locally-redundant storage): Replicates your data three times within a single data center in the vault’s region. Protects against hardware failures but not against data center or regional failures.
-
ZRS (Zone-redundant storage): Replicates your data across three availability zones in the vault’s region. Protects against data center failures within the region.
-
GRS (Geo-redundant storage): Replicates your data to a secondary Azure region hundreds of miles away. Protects against regional outages and provides the highest level of durability.
The backup storage redundancy setting is immutable after the vault is created. Choose your redundancy option carefully, as you can’t change it later without creating a new policy and re-backing up the resources.
Retention times are always converted to days, so a week is 7 days, a month is 30 days, and a year is 365 days.
Set PiTR schedules
This step applies only if you selected Point-in-time recovery as your backup policy type.
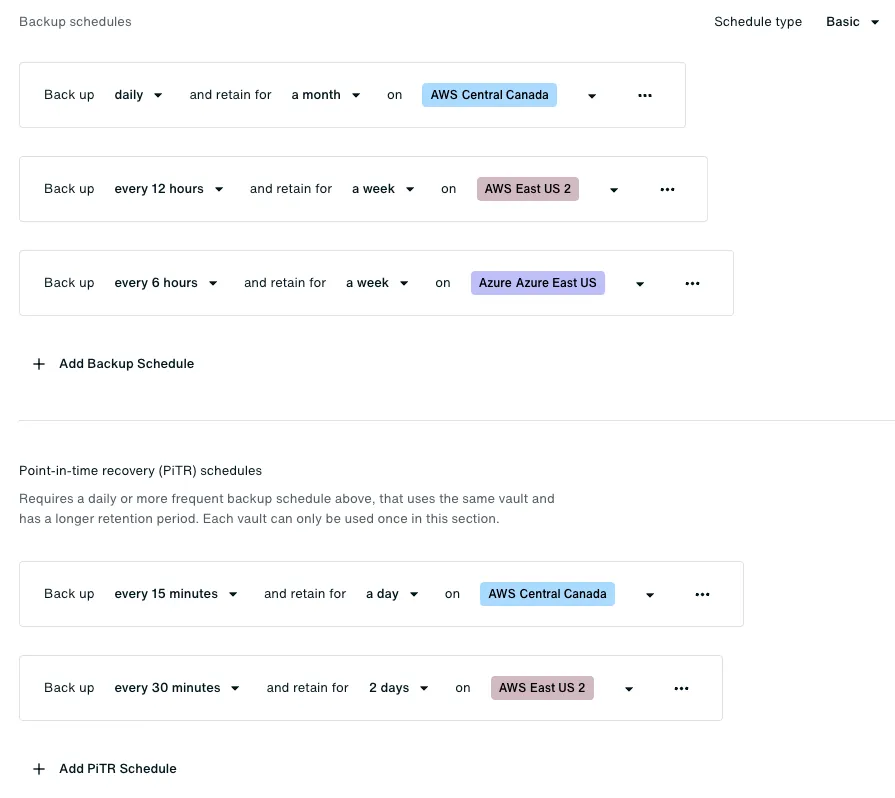
Under Point-in-time recovery (PiTR) schedules, you can set the frequency and retention for PiTR snapshots. You can add as many PiTR schedules as you need.
PiTR schedules must conform to these requirements:
-
A vault can be used by one PiTR schedule.
-
The vault in a PiTR schedule must be used by a backup schedule whose frequency is daily or more frequent, and whose retention period is longer than the PiTR retention period.
To work with PiTR schedules:
-
To add a schedule: Click Add PiTR Schedule and configure the schedule.
-
To duplicate a schedule: Click the schedule’s (Actions) menu, then click Duplicate.
-
To delete a schedule: Click the schedule’s (Actions) menu, then click Delete.
Create a backup policy for Google Workspace
To get started, in the Backup Policies page, click Create Backup Policy.
Before you start
Before you create a Google Workspace backup policy, make sure you’ve connected the workspace you want to back up. See Google Workspace: Connect Source Workspaces for instructions.
Choose the backup policy type
For Backup source, choose SaaS application.
In Apply policy to, choose Google Workspace. For more information on backup policy types, see Backup policy types.
These settings can’t be changed after you continue.
Click Continue.
Choose the workspace
In the Google Workspace step, select the workspace you want to back up. The list shows only workspaces connected as a Google Workspace source workspace, and marks a workspace already covered by another policy as Already in a policy.
Click Next.
Choose what to back up
In the Backup Settings step, provide a Backup policy name, then choose what to back up in the workspace.
Under Users, Back up all organizational units and groups is on, which backs up every user’s Gmail mailbox and Drive. To narrow the scope, turn Back up all organizational units and groups off and choose what to leave out:
-
In Excluded organization units, search for and select the organizational units you don’t want to back up.
-
In Excluded groups, search for and select the groups you don’t want to back up.
A user in an excluded organizational unit or group isn’t backed up, even when they also belong to one you’re backing up. See Group and organizational unit exclusions for details.
Then choose whether to back up the other data in the workspace:
-
Turn Back up groups on to back up your Google Groups, including each group’s settings and membership.
-
Turn Back up shared drives on to back up the shared drives in the workspace.
Click Next.
Create a backup policy for Microsoft 365
To get started, in the Backup Policies page, click Create Backup Policy.
Before you start
Before you create a Microsoft 365 backup policy, make sure you’ve connected the tenant you want to back up as a Microsoft 365: Connect Source Tenants.
Choose the backup policy type
For Backup source, choose SaaS application.
In Apply policy to, choose Microsoft 365. For more information on backup policy types, see Backup policy types.
These settings can’t be changed after you continue.
Click Continue.
Choose the tenant
In Resource selection, choose the Microsoft 365 tenant you want to back up. Only tenants connected as a Microsoft 365 source tenant appear in the list, and each tenant can be assigned to only one Microsoft 365 backup policy.
Click Next.
Review the protection summary
In the Protection summary step, review the users, SharePoint sites, and teams covered by your selections, and confirm there’s nothing unexpected.
If you need to make changes, click Back to edit your selections.
Click Next to continue.
Create a backup policy for Microsoft Entra ID
To get started, in the Backup Policies page, click Create Backup Policy.
Before you start
Before you create a Microsoft Entra ID backup policy, make sure you’ve connected the source tenant you want to back up. See Microsoft Entra ID: Connect Source Tenants.
Choose the backup policy type
For Backup source, choose SaaS application.
In Apply policy to, choose Entra ID. For more information on backup policy types, see Backup policy types.
These settings can’t be changed after you continue.
Click Continue.
Choose the tenant
In Resource selection, choose the Microsoft Entra ID tenant you want to back up. Only tenants connected as a Microsoft Entra ID source tenant appear in the list, and each tenant can be assigned to only one Microsoft Entra ID backup policy.
Each snapshot covers the whole directory. See Directory scope for what that includes.
Click Next.
Enable or disable a backup policy
You can enable or disable a backup policy at any time. Each policy is enabled by default when you create it. To toggle a policy’s status, click the switch in the upper right corner of the policy card.
When a policy is disabled, no new backups are taken for its assigned resources. Existing snapshots taken by the policy are retained according to their retention settings.