

Manage Notification Policies for Datadog
Who can use this feature
Anyone with these permissions: Manage notification policies
This article explains how to create notification policies that send notifications to Datadog.
When a subscribed event happens in Eon, Eon posts an event to the Datadog Events API, which adds it to your Datadog event stream. To connect Eon to Datadog, you need your Datadog site and an API key.
Create a notification policy for Datadog
Before you start
Make sure you have access to your Datadog organization with permissions to manage API keys.
Get your Datadog site and API key
In this step, you’ll copy your Datadog site and create an API key that Eon uses to authenticate with Datadog. Both are on the API Keys page in Datadog.
-
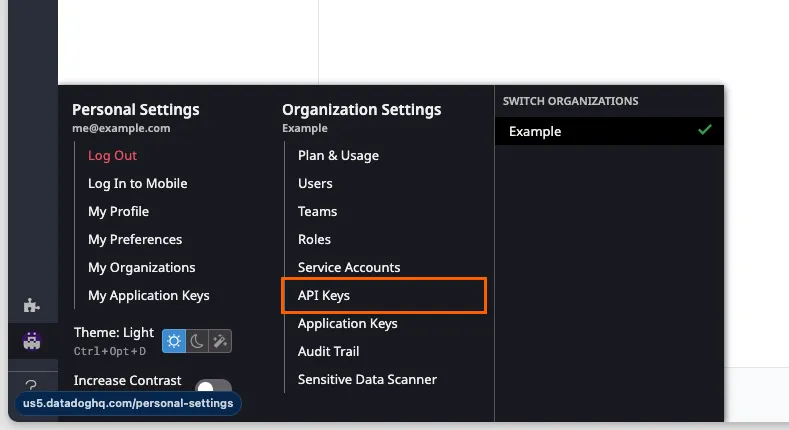
In your Datadog account menu, click Organization Settings → API Keys. The API Keys page opens.
-
Note the Site value at the top of the page (for example,
us5.datadoghq.com). You’ll enter this site when configuring the notification policy in Eon.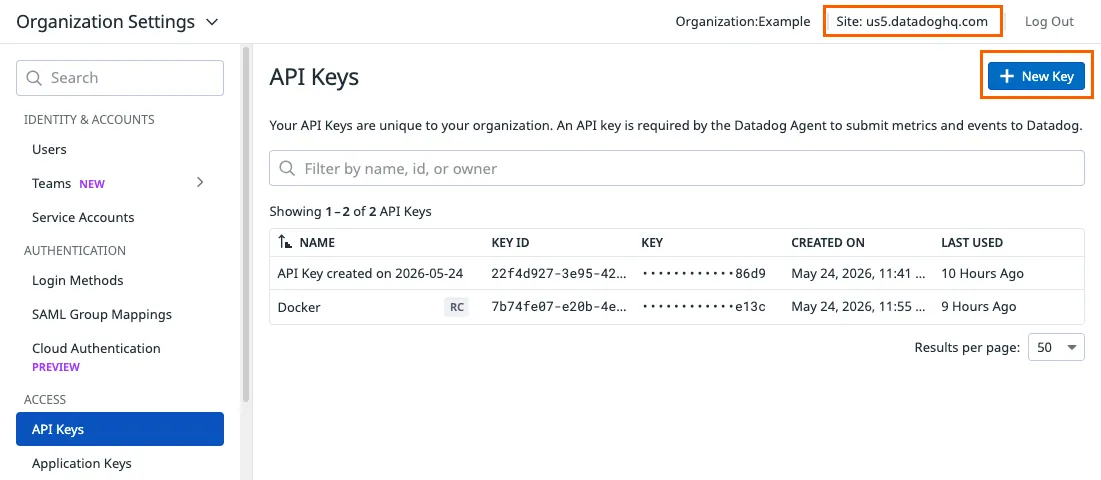
-
Click New Key.
-
Enter a name for the key (for example,
Eon Notifications), and then click Create Key. The new API key is shown. -
Copy the key value and save it in a temporary location so you can provide it to Eon in the next step.
Create the notification policy in Eon
In this step, you’ll enter the Datadog site and API key from the previous step. Log in to Eon to complete this step:
-
In the Notification Policies page in the Eon console, click Create Notification Policy. The Create a Notification Policy wizard opens.
-
Enter a Notification policy name that describes the Datadog organization notifications will be sent to.
-
Choose the Datadog notification channel type, then click Next.
-
Enter these values:
-
Click Next to continue.
Choose the notifications to send
-
Pick the events you want to subscribe to.
-
Optionally, set event conditions to filter which events trigger notifications:
To filter notifications to specific events, turn Apply event conditions on. With conditions turned on, you’ll receive notifications only for events that match the conditions you set.
To leave Apply event conditions off, you’ll receive notifications for all events of the selected types.
When you turn Apply event conditions on, click Set Condition to choose the event properties you want to filter by. You can filter by vaults, backup policies, resources, or source accounts.
You can set a simple AND or OR list of conditions, or you can group conditions for fine-tuned event filtering.
See how to work with conditions and groups
Work with conditions
-
To add a condition: Click (Add condition), then select the property, operator, and value for the condition.
-
To add a condition within a group: Click the large (Add condition) button in the group, or select (Add condition) > Add condition > Above or Below. Then select the property, operator, and value for the condition.
-
To delete a condition: Click the condition’s (Actions) menu, then click Delete condition.
For each condition, set the property, operator, and value.
Work with groups
-
To nest an existing condition or group in a group: In an existing condition or group, click (Actions) > Create group. Select the group’s logical AND or OR operator.
-
To delete a group and all the conditions it contains: Click the group’s (Actions) menu, then click Delete group.
-
-
When you’re done, click Test and Create.
Eon sends a test event to Datadog to confirm the connection.
If the test succeeds, the notification policy is created.
If the test fails, check that your Datadog site and API key are correct.
Your notification policy is now set up, and Eon sends subscribed events to Datadog. You can find your Eon events in Datadog in the Event Management view (Monitoring → Event Management → All Events in the left menu).